GNSS RTK GPS - Point One
Step-by-step guide for setting up and flashing the Point One Navigation GNSS RTK GPS Standard Dev Kit, used to obtain a centimeter-level GPS accuracy. Includes driver installation, firmware flashing, and system verification for Windows and macOS.
Use the table of contents on the right to navigate this page. You can also use the mobile menu to access the navigation.
1. Introduction
The Point One Navigation Standard Development Kit is a high-precision GNSS-based positioning system designed for real-time kinematic (RTK) applications. It provides centimeter-level location accuracy and is ideal for integration into autonomous systems such as robotic cars, drones, or research platforms.
This development kit includes both GNSS (Global Navigation Satellite System) and an onboard IMU (Inertial Measurement Unit), allowing for reliable and stable positioning even in environments where satellite signals may temporarily degrade — such as tunnels or near large structures.
The GNSS module delivers global position data using satellite constellations like GPS, GLONASS, and Galileo, while the IMU provides orientation, acceleration, and angular velocity data that enhance accuracy and robustness in dynamic or partially obstructed conditions.
Proper setup, flashing, and calibration of the firmware are essential to ensure that your device is fully recognized and ready for software integration and sensor fusion in high-accuracy navigation tasks.
2. Requirements
To follow this tutorial, you will need:
- A Windows computer
- The Point One Navigation Standard Dev Kit
- A micro-USB cable (usually provided in the kit)
Additionally, please install the following software on your computer:
-
USB Serial Driver – Enables your PC to recognize the connected GNSS module 📥 Download USB Driver for Windows
-
Point One Desktop – Used for updating firmware and configuring the module 📥 Download Point One Desktop for Windows
-
Firmware File – Latest firmware for the Standard Dev Kit 📥 Download Firmware
💡 For additional documentation and tools, check the official Point One resource portal: https://pointonenav.com/resources/
3. Flashing Tutorial
Follow these steps to set up your device correctly.
A. Install USB Serial Driver
-
Download the USB Driver 📥 Download USB Driver (Windows)
- Extract the ZIP Archive
- Right-click the downloaded ZIP file and choose Extract All.
- Remember the folder location (you’ll need it in the next step).
-
Connect the GNSS Dev Kit Use a micro-USB cable to connect your Standard Dev Kit to the computer.
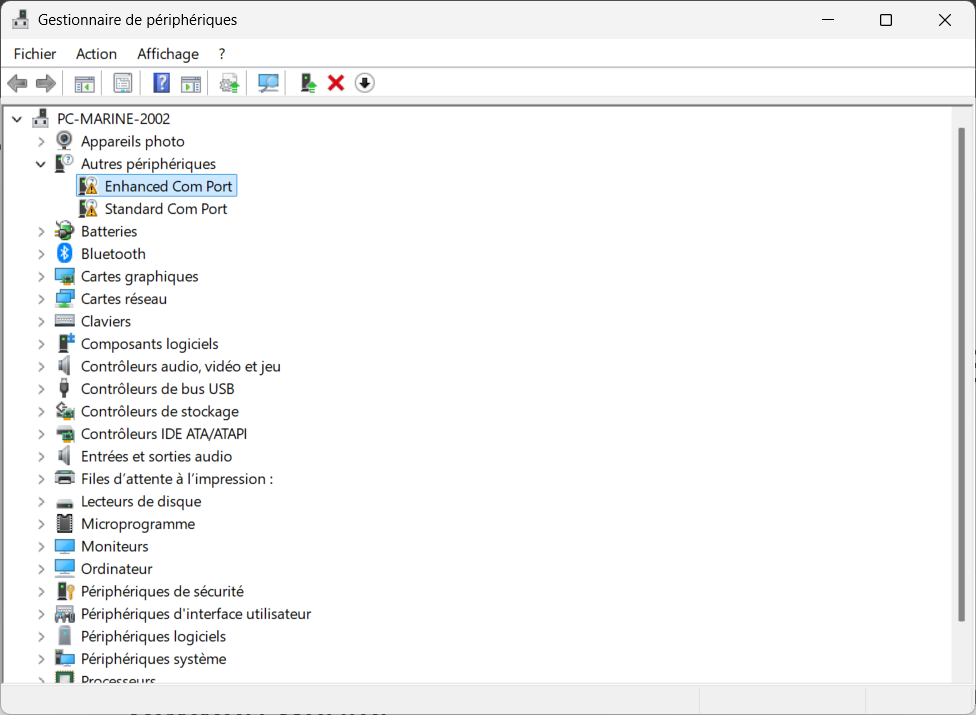
- Open Device Manager
- Press
Windows + X→ select Device Manager - Under Other devices (Autres périphériques), you’ll likely see:
- ❗ Enhanced Com Port
- ❗ Standard Com Port with yellow warning icons — this means Windows doesn’t recognize the device yet.
- Press
Here’s what you’ll typically see before installing the driver:
- Manually Install the Driver
- Right-click on Enhanced Com Port
- Select Update driver
- Choose Browse my computer for drivers
- Navigate to the folder where you extracted the driver ZIP file
- Click Next to install
- Repeat the same for Standard Com Port
- Verify Successful Installation
After installation, the devices will appear under Ports (COM & LPT), recognized as:
Silicon Labs CP210x USB to UART Bridge (COMX)
B. Launch Point One Desktop & Configure GNSS Connection
Once the USB driver is installed and your device is recognized, you can begin configuring your GNSS module using the Point One Desktop software.
1. Launch Point One Desktop
- Open the application:
PointOne→ the GUI should launch with a satellite map view and a left-hand settings menu.
2. Select the Serial Port
- Under Connection Settings, select the appropriate serial port (e.g.,
COM3,COM4, etc.) that corresponds to your GNSS module. - Set the baud rate to
460800(or leave at default if you’re unsure). - Protocol: leave as
Auto - Check the “Connect on Start” box if you want the software to auto-connect next time.
3. Configure GNSS Corrections
- Scroll down to GNSS Corrections
- Choose:
- ✅ Polaris as the correction source
- 🔒 GNSS Caster:
polaris.pointonenav.com - 🔑 Polaris API Key: enter the API key provided to you or the one from your point account.
Here’s what the configuration should look like once completed:
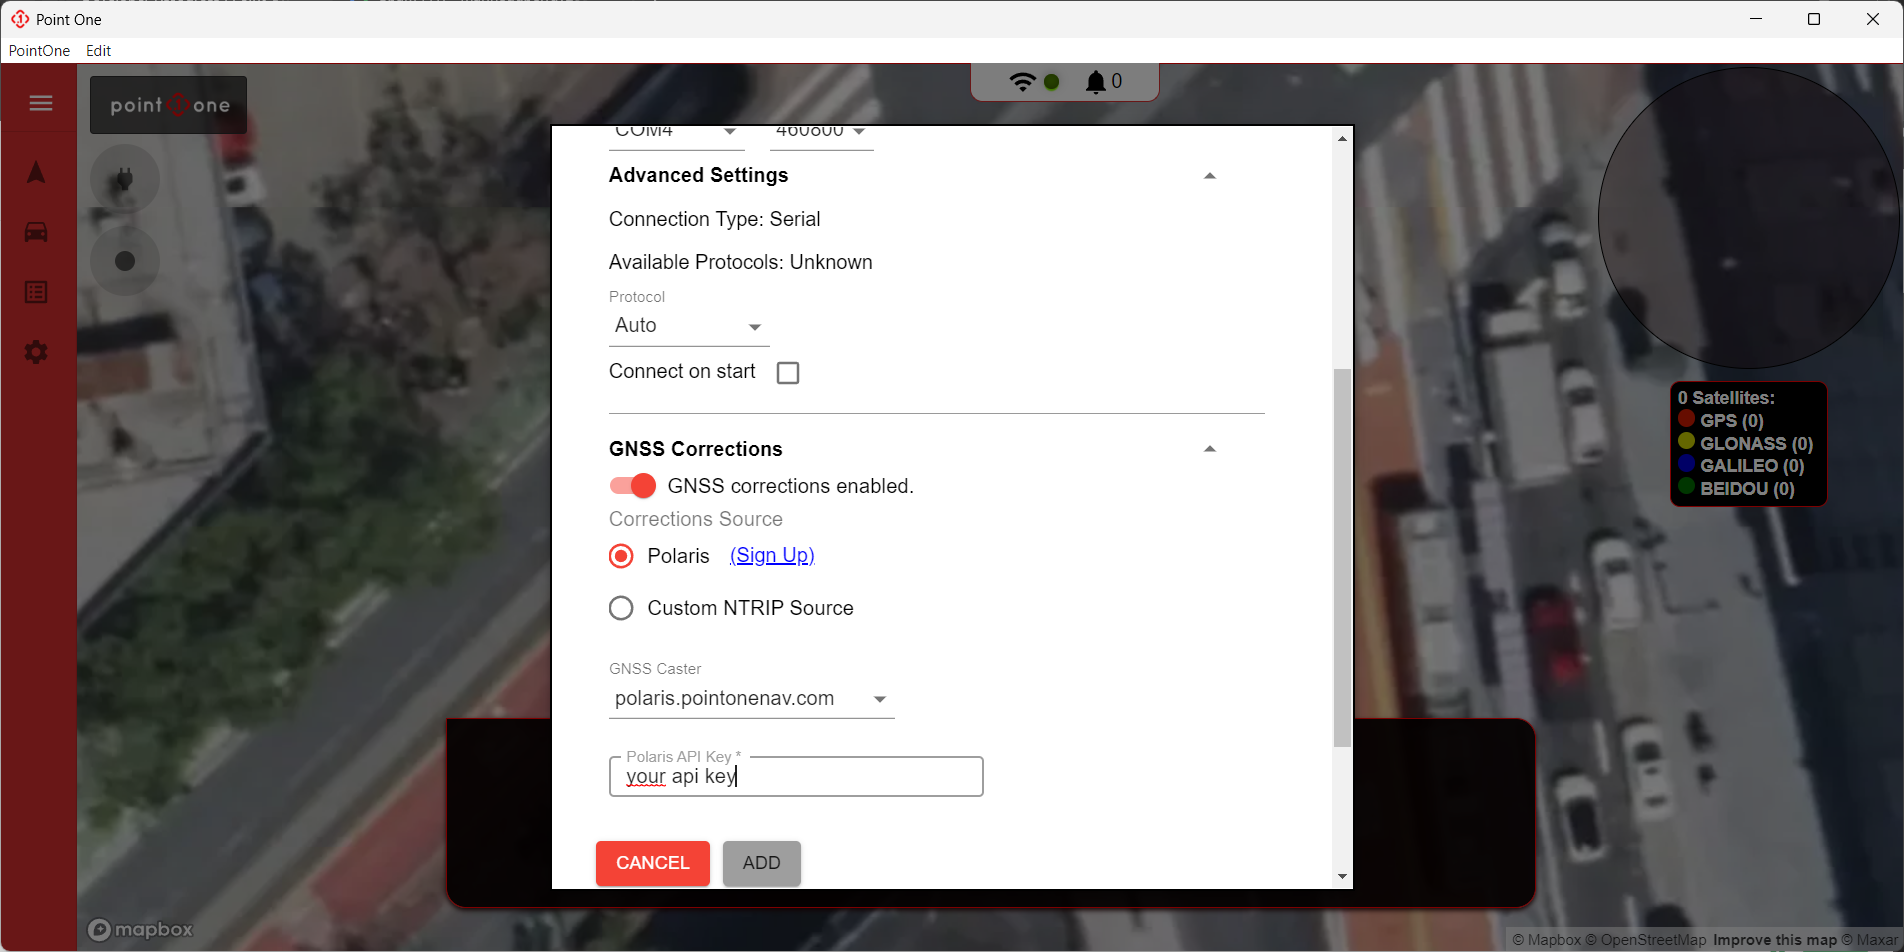
Once everything is configured, click ADD to save the GNSS connection.
You are now ready to move forward with firmware flashing or device integration.
C. Update the GNSS Firmware
Once the device is connected via USB and Point One Desktop is configured, you can now update your GNSS module with the latest firmware.
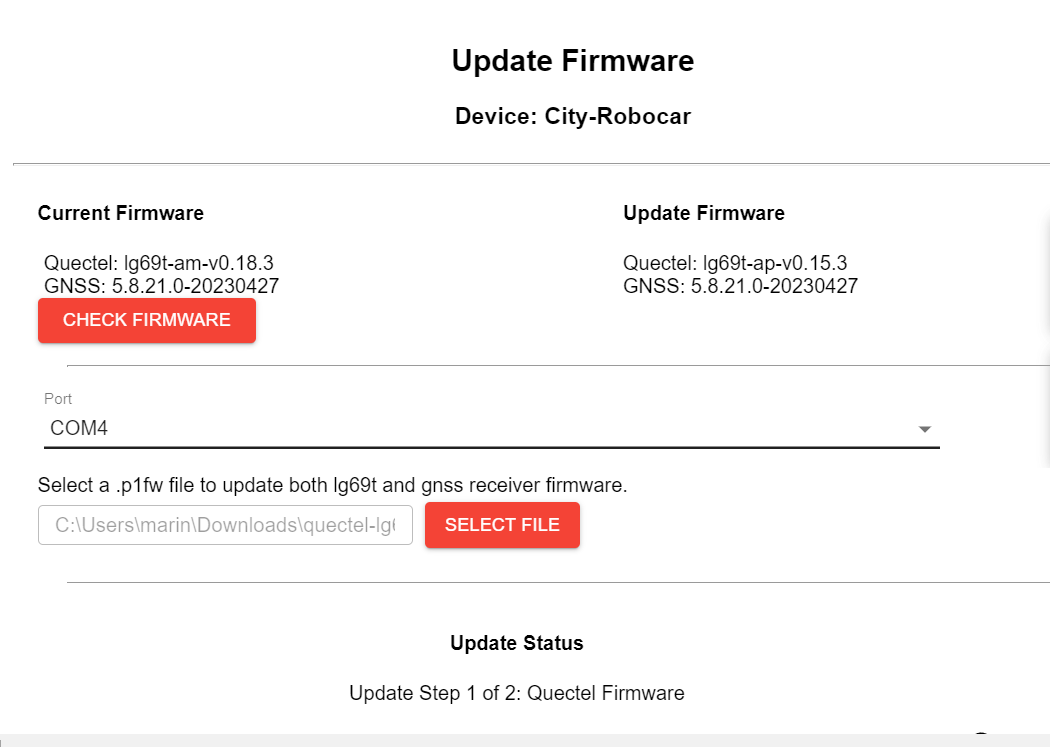
1. Open the Firmware Update Tab
- Click on the gear icon in the left sidebar of Point One Desktop.
- The software should automatically detect the connected device and display the Current Firmware and the recommended Update Firmware versions.
- Ensure the correct serial Port is selected (e.g.,
COM4).
2. Load Firmware File
-
You can download the last firmware version in the requirements.
-
Click SELECT FILE and navigate to the downloaded
.p1fwfirmware file.
3. Begin Firmware Update
- Click CHECK FIRMWARE if needed to refresh version info.
- Once the file is selected, the update will begin in two steps:
- Quectel Firmware
- GNSS Receiver Firmware
- Do not disconnect the USB or power during this process.
Here’s what the firmware update window looks like before starting:
After a successful update, you should see a confirmation like this:
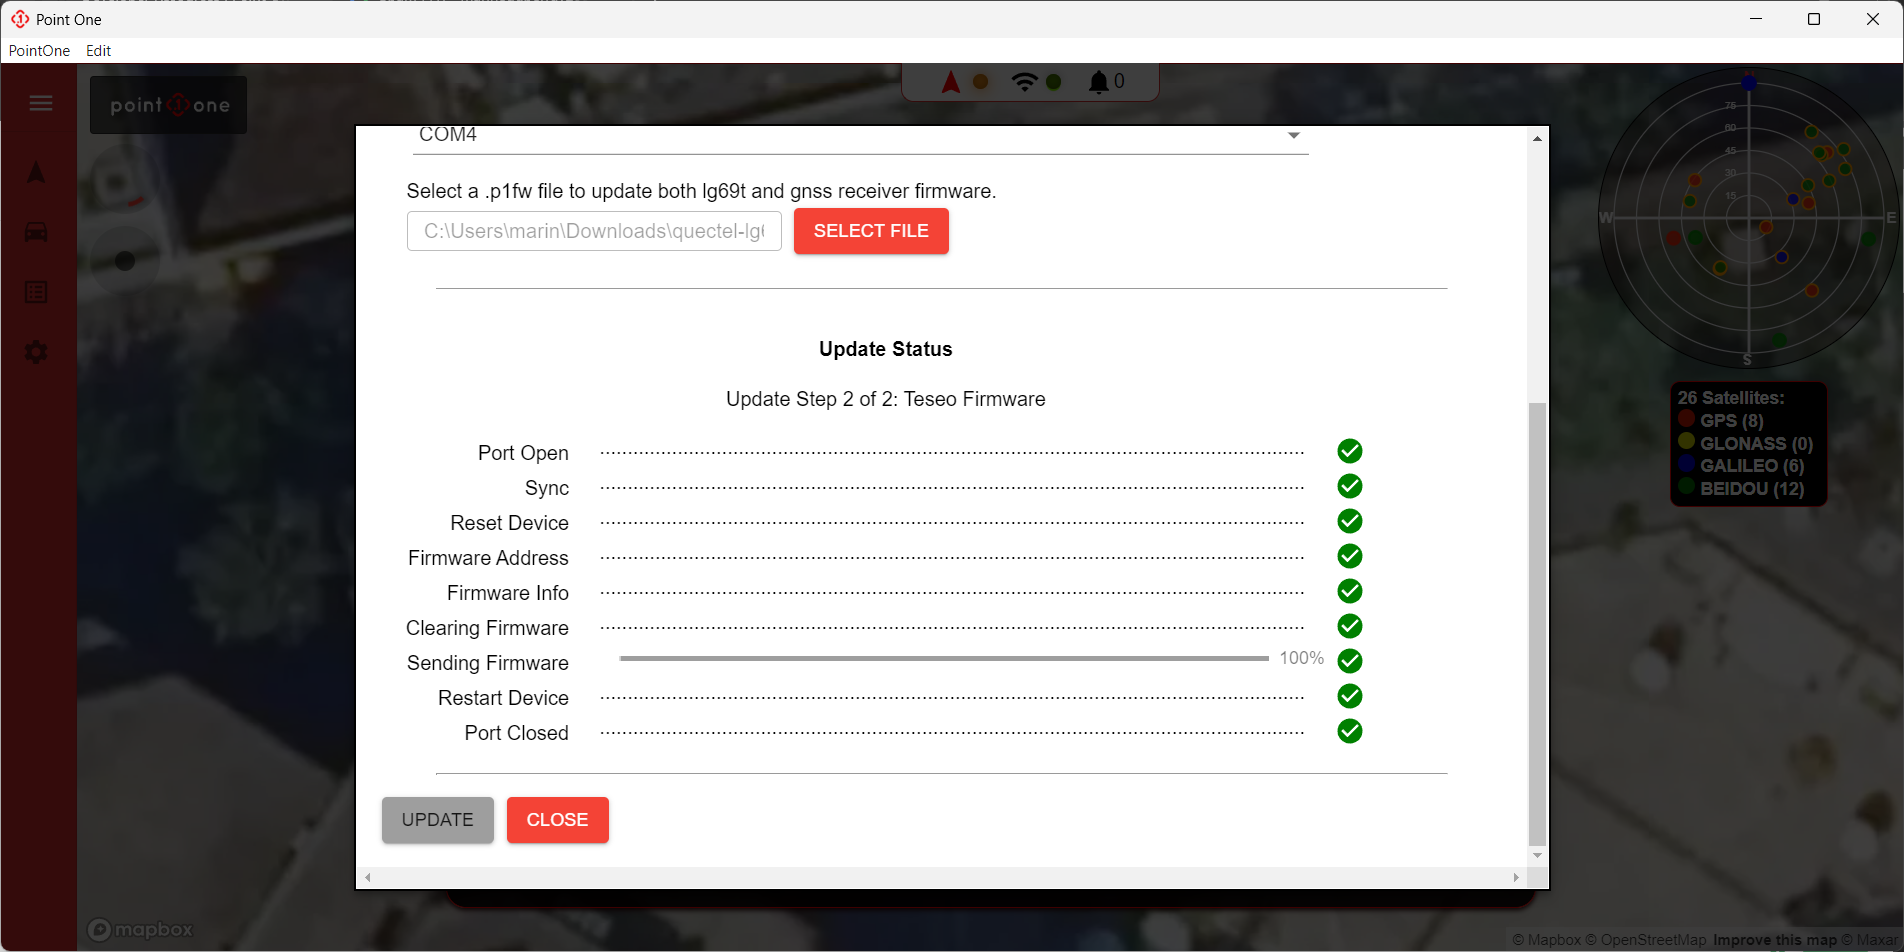
Your GNSS module is now up-to-date and ready for RTK positioning with enhanced performance and stability.
4. Python Development
To interface with the GNSS module programmatically, use Point One Host Tools.
This set of Python applications allows logging data, configuration, and sending RTK corrections from Polaris.
📦 Repo: https://github.com/PointOneNav/p1-host-tools
📚 Docs: https://pointonenav.com/docs/
Setup / Installation
Clone the repository:
git clone https://github.com/PointOneNav/p1-host-tools.git
cd p1-host-tools
Create a virtual environment:
python3 -m venv venv
source venv/bin/activate
(Windows: venv\Scripts\activate.bat)
Install requirements:
pip install -r requirements.txt
Using Polaris Corrections with p1_runner
- Connect the GNSS module via USB
- Activate your Python virtual environment
- Run the following command with your Polaris key:
python3 bin/runner.py --device-id my-device --polaris abcd1234
Logs will be saved in ~/logs (Linux/macOS) or %USERPROFILE%\Documents\logs (Windows).
Configuration with config_tool
You can read or modify configuration settings via:
python3 bin/config_tool.py apply uart1 message_rate fusion_engine posemessage on
python3 bin/config_tool.py apply uart1 message_rate nmea gga off
python3 bin/config_tool.py save
Make sure to call save to persist the settings after applying them.
Tips
- Always connect the GNSS device before starting the tool
- Re-run pip install -r requirements.txt after pulling updates from the repo
- Use –device-port /dev/ttyUSBX if auto-detection fails
✅ Notes
- Ensure the device is on a flat, unobstructed surface when testing GPS lock.
- Some installations (especially on Windows) may require rebooting after driver installation.
- Avoid powering down the device during firmware flashing.
For issues or improvements, open a GitHub issue or submit a pull request. Please attach logs, error messages, or screenshots to help debug efficiently.
The improved styling includes better spacing, more color accents, and enhanced readability for all content elements.